A Study of Basketmaker III Black-on-white Bowl Motifs in the Four Corners Region
  • HOME
  • PROJECT
    • Curatorial Facilities
    • Four Corners Region
    • AZ Apache County
    • AZ Navajo County
    • CO Dolores County
    • CO La Plata County
    • CO Montezuma County
    • NM San Juan County
    • NM McKinley County
    • NM Sandoval County
    • UT San Juan County
  • MOTIF 1
    • Motif 1: Forms
    • A.D. 575-650 (pg. 1) >
      • Basic (pg. 2)
      • Reduced (pg. 3)
      • Joined (pg. 4)
      • NFS (pg. 5)
      • Through Time (pg. 6)
      • Basketmaker II (pg. 7)
    • Motif 1: AZ.E81
    • Motif 1: AZ.E84
    • Motif 1: AZ Tseahatso
    • Motif 1: CO 5DL112
    • Motif 1: CO 5DL1091
    • Motif 1: CO 5LP10843
    • Motif 1: CO 5MT1
    • Motif 1: CO 5MT3
    • Motif 1: CO 5MT2525
    • Motif 1: CO 5MT3319
    • Motif 1: CO 5MT5834
    • Motif 1: CO 5MT8899
    • Motif 1: CO 5MT8937
    • Motif 1: CO 5MT9072
    • Motif 1: CO 5MT9168
    • Motif 1: CO 5MT9360
    • Motif 1: CO 5MT9387
    • Motif 1: CO 5MT9540
    • Motif 1: CO 5MT10647
    • Motif 1: CO 5MT11861
    • Motif 1: CO 5MT12205
    • Motif 1: CO 5MT20065
    • Motif 1: CO 5MV101
    • Motif 1: CO 5MV145
    • Motif 1: CO 5MV1285
    • Motif 1: CO 5MV1644
    • Motif 1: NM 29SJ299
    • Motif 1: NM 29SJ423
    • Motif 1: NM 29SJ1659
    • Motif 1: NM LA2501
    • Motif 1: NM LA2506
    • Motif 1: NM LA2507
    • Motif 1: NM LA11610
    • Motif 1: NM LA80422
    • Motif 1: NM LA80425
    • Motif 1: UT 42SA8540
    • Motif 1: UT 42SA8543
    • Motif 1: UT 42SA8821
    • Motif 1: UT 42SA8880
    • Motif 1: UT 42SA8895
  • MOTIF 2
    • Motif 2: Forms
    • A.D. 575-650 (pg. 1) >
      • Triangular (pg. 2)
      • T-shaped (pg. 3)
      • Line (pg. 4)
      • Through Time (pg. 5)
      • Basketmaker II (pg. 6)
    • Motif 2: AZ E7.11
    • Motif 2: AZ E8.4
    • Motif 2: CO 5DL112
    • Motif 2: CO 5DL309
    • Motif 2: CO 5DL1138
    • Motif 2: CO 5LP39
    • Motif 2: CO 5LP10843
    • Motif 2: CO 5MT1
    • Motif 2: CO 5MT2525
    • Motif 2: CO 5MT3319
    • Motif 2: CO 5MT4684
    • Motif 2: CO 5MT7295
    • Motif 2: CO 5MT8937
    • Motif 2: CO 5MT9072
    • Motif 2: CO 5MT9168
    • Motif 2: CO 5MT9540
    • Motif 2: CO 5MT9949
    • Motif 2: CO 5MT10647
    • Motif 2: CO 5MT11861
    • Motif 2: CO 5MT12205
    • Motif 2: CO 5MV101
    • Motif 2: CO 5MV117
    • Motif 2: CO 5MV1200
    • Motif 2: CO 5MV1285
    • Motif 2: CO 5MV1937
    • Motif 2: CO 5MV1940
    • Motif 2: NM 29SJ299
    • Motif 2: NM 29SJ423
    • Motif 2 NM LA2501
    • Motif 2: NM LA2506
    • Motif 2: NM LA2507
    • Motif 2: NM LA11610
    • Motif 2: NM LA61956
    • Motif 2: NM LA80422
    • Motif 2: NM LA80425
    • Motif 2: UT 42SA13
    • Motif 2: UT 42SA6396
    • Motif 2: UT 42SA6757
    • Motif 2: UT 42SA8540
    • Motif 2: UT 42SA8543
    • Motif 2: UT 42SA8821
    • Motif 2: UT 42SA8895
  • MOTIF 3
    • Motif 3: Forms
    • A.D. 575-650 (pg. 1) >
      • 45 Degrees (pg. 2)
      • 90 Degrees (pg. 3)
      • Through Time (pg. 4)
    • Motif 3: AZ E85
    • Motif 3: AZ E810
    • Motif 3: AZ NA3570
    • Motif 3: CO 5DL112
    • Motif 3: CO 5DL121B
    • Motif 3: CO 5DL297
    • Motif 3: CO 5DL310
    • Motif 3: CO 5DL1105
    • Motif 3: CO 5LP10843
    • Motif 3: CO 5MT1
    • Motif 3: CO 5MT2525
    • Motif 3: CO 5MT2858
    • Motif 3: CO 5MT3319
    • Motif 3 : CO 5MT4545
    • Motif 3: CO 5MT4684
    • Motif 3: CO 5MT5011
    • Motif 3: CO 5MT8565
    • Motif 3: CO 5MT8899
    • Motif 3: CO 5MT8937
    • Motif 3: CO 5MT9072
    • Motif 3: CO 5MT9168
    • Motif 3: CO 5MT9387
    • Motif 3: CO 5MT9540
    • Motif 3: CO 5MT9949
    • Motif 3: CO 5MT10647
    • Motif 3: CO 5MT11861
    • Motif 3: CO 5MT12205
    • Motif 3: CO 5MV101
    • Motif 3: CO 5MV117
    • Motif 3: CO 5MV145
    • Motif 3: CO 5MV405
    • Motif 3: CO 5MV1060
    • Motif 3: CO 5MV1285
    • Motif 3: CO 5MV1644
    • Motif 3: CO 5MV1676
    • Motif 3: CO 5MV1937
    • Motif 3: CO 5MV1938
    • Motif 3: CO 5MV1990
    • Motif 3: NM 29SJ299
    • Motif 3: NM 29SJ423
    • Motif 3: NM 29SJ519
    • Motif 3: NM 29SJ1659
    • Motif 3: NM LA2501
    • Motif 3: NM LA2506
    • Motif 3: NM LA2507
    • Motif 3: NM LA5631
    • Motif 3: NM LA11610
    • Motif 3: NM LA57024
    • Motif 3: NM LA61956
    • Motif 3: NM LA80407
    • Motif 3: NM LA80422
    • Motif 3: NM LA80425 (1/2)
    • Motif 3: NM LA80425 (2/2)
    • Motif 3: UT 42SA13
    • Motif 3: UT 42SA3775
    • Motif 3: UT 42SA4989
    • Motif 3: UT 42SA6396
    • Motif 3: UT 42SA8540
    • Motif 3: UT 42SA8542
    • Motif 3: UT 42SA8543
    • Motif 3: UT 42SA8821
    • Motif 3: UT 42SA8880
    • Motif 3: UT 42SA8895
    • Motif 3: UT 42SA20977
  • MOTIF 4
    • Motif 4: Forms and Variations
    • Motif 4: AZ E81
    • Motif 4: AZ E85
    • Motif 4: AZ E810
    • Motif 4: CO 5DL112
    • Motif 4: CO 5LP39
    • Motif 4: CO 5LP10201
    • Motif 4: CO 5LP10843
    • Motif 4: CO 5MT1
    • Motif 4: CO 5MT3
    • Motif 4: CO 5MT2378
    • Motif 4: CO 5MT2525
    • Motif 4: CO 5MT2858
    • Motif 4: CO 5MT3319
    • Motif 4: CO 5MT4545
    • Motif 4: CO 5MT4684
    • Motif 4: CO 5MT7295
    • Motif 4: CO 5MT7323
    • Motif 4: CO 5MT8565
    • Motif 4: CO 5MT8837
    • Motif 4: CO 5MT8899
    • Motif 4: CO 5MT8937
    • Motif 4: CO 5MT9072
    • Motif 4: CO 5MT9168
    • Motif 4: CO 5MT9387
    • Motif 4: CO 5MT9540
    • Motif 4: CO 5MT10647
    • Motif 4: CO 5MT11861
    • Motif 4: CO 5MT12205
    • Motif 4: CO 5MV0101
    • Motif 4: CO 5MV145
    • Motif 4: NM 29SJ299
    • Motif 4: NM 29SJ423
    • Motif 4: NM LA2501
    • Motif 4: NM LA2506
    • Motif 4: NM LA2507
    • Motif 4: NM LA5631
    • Motif 4: NM LA11610
    • Motif 4: NM LA80407
    • Motif 4: NM LA80422
    • Motif 4: NM LA80425
    • Motif 4: UT 42SA13
    • Motif 4: UT 42SA4989
    • Motif 4: UT 42SA6396
    • Motif 4: UT 42SA6757
    • Motif 4: UT 42SA8540
    • Motif 4: UT 42SA8821
    • Motif 4: UT 42SA8880
    • Motif 4: UT 42SA8895
    • Motif 4: UT 42SA20977
  • MOTIF 5
    • Motif 5: Forms and Variations
    • Motif 5: AZ E81
    • Motif 5: AZ E85
    • Motif 5: AZ NA3570
    • Motif 5: AZ Tseahatso
    • Motif 5: CO 5DL112
    • Motif 5: CO 5DL121B
    • Motif 5: CO 5DL309
    • Motif 5: CO 5DL310
    • Motif 5: CO 5DL1091
    • Motif 5: CO 5DL1105
    • Motif 5: CO 5LP39
    • Motif 5: CO 5LP10201
    • Motif 5: CO 5LP10843
    • Motif 5: CO 5MT1
    • Motif 5: CO 5MT2525
    • Motif 5: CO 5MT2858
    • Motif 5: CO 5MT3319
    • Motif 5: CO 5MT4545
    • Motif 5: CO 5MT4684
    • Motif 5: CO 5MT5011
    • Motif 5: CO 5MT7295
    • Motif 5: CO 5MT7323
    • Motif 5: CO 5MT8565
    • Motif 5: CO 5MT8837
    • Motif 5: CO 5MT8899
    • Motif 5: CO 5MT8937
    • Motif 5: CO 5MT9072 (1/3)
    • Motif 5: CO 5MT9072 (2/3)
    • Motif 5: CO 5MT9072 (3/3)
    • Motif 5: CO 5MT9168
    • Motif 5: CO 5MT9387
    • Motif 5: CO 5MT9540
    • Motif 5: CO 5MT9949
    • Motif 5: CO 5MT10647
    • Motif 5: CO 5MT11861 (1/3)
    • Motif 5: CO 5MT11861 (2/3)
    • Motif 5: CO 5MT11861 (3/3)
    • Motif 5: CO 5MT12205
    • Motif 5: CO 5MV101
    • Motif 5: CO 5MV117
    • Motif 5: CO 5MV118
    • Motif 5: CO 5MV145
    • Motif 5: CO 5MV283
    • Motif 5: CO 5MV405
    • Motif 5: CO 5MV1060
    • Motif 5: NM 29SJ299
    • Motif 5: NM 29SJ423
    • Motif 5: NM 29SJ1659
    • Motif 5 NM LA2501
    • Motif 5: NM LA2506
    • Motif 5: NM LA2507
    • Motif 5: NM LA11610
    • Motif 5: NM LA61956
    • Motif 5: NM LA80407
    • Motif 5: NM LA80422
    • Motif 5: NM LA80425
    • Motif 5: UT 42SA2
    • Motif 5: UT 42SA13
    • Motif 5: UT 42SA620
    • Motif 5: UT 42SA4989
    • Motif 5: UT 42SA6396 (1/2)
    • Motif 5: UT 42SA6396 (2/2)
    • Motif 5: UT 42SA6403
    • Motif 5: UT 42SA6757
    • Motif 5: UT 42SA8540
    • Motif 5: UT 42SA8542
    • Motif 5: UT 42SA8543
    • Motif 5: UT 42SA8545
    • Motif 5: UT 42SA8821
    • Motif 5: UT 42SA8876
    • Motif 5: UT 42SA8880
    • Motif 5: UT 42SA8889
    • Motif 5: UT 42SA8895 (1/2)
    • Motif 5: UT 42SA8895 (2/2)
    • Motif 5: UT 42SA20977
  • MOTIF 6
    • Motif 6: Forms and Variations
    • Motif 6: AZ E81
    • Motif 6: AZ E:8:10
    • Motif 6: CO 5DL112
    • Motif 6: CO 5DL310
    • Motif 6: CO 5DL1091
    • Motif 6: CO 5DL1138
    • Motif 6: CO 5LP10201
    • Motif 6: CO 5LP10843
    • Motif 6: CO 5MT1 (1)
    • Motif 6: CO 5MT3
    • Motif 6: CO 5MT2525
    • Motif 6: CO 5MT2858
    • Motif 6: CO 5MT4545
    • Motif 6: CO 5MT4684
    • Motif 6: CO 5MT7323
    • Motif 6: CO 5MT8822
    • Motif 6: CO 5MT8937
    • Motif 6: CO 5MT9072
    • Motif 6: CO 5MT9168
    • Motif 6: CO 5MT9387
    • Motif 6: CO 5MT9540
    • Motif 6: CO 5MT10647
    • Motif 6: CO 5MT11861 (1)
    • Motif 6: CO 5MT11861 (2)
    • Motif 6: CO 5MT12205
    • Motif 6: CO 5MV101
    • Motif 6: CO 5MV117
    • Motif 6: CO 5MV405
    • Motif 6: NM 29SJ299
    • Motif 6: NM 29SJ1659
    • Motif 6: NM LA2501
    • Motif 6: NM LA2506
    • Motif 6: NM LA2507
    • Motif 6: NM LA61956
    • Motif 6: NM LA80407
    • Motif 6: NM LA80422
    • Motif 6: NM LA80425
    • Motif 6: UT 42SA7
    • Motif 6: UT 42SA13
    • Motif 6: UT 42SA6396
    • Motif 6: UT 42SA6403
    • Motif 6: UT 42SA6757
    • Motif 6: UT 42SA8540
    • Motif 6: UT 42SA8543
    • Motif 6: UT 42SA8545
    • Motif 6: UT 42SA8821
    • Motif 6: UT 42SA8880
    • Motif 6: UT 42SA8895
    • Motif 6: UT 42SA20977
  • MOTIF 7
    • Motif 7: Forms and Variations
    • Motif 7: AZ E8.10
    • Motif 7: AZ Tseahatso
    • Motif 7: CO 5DL112
    • Motif 7: CO 5DL297
    • Motif 7: CO 5DL309
    • Motif 7: CO 5DL310
    • Motif 7: CO 5DL1091
    • Motif 7: CO 5DL1138
    • Motif 7: CO 5LP39
    • Motif 7: CO 5LP10201
    • Motif 7: CO 5MT1 (1)
    • Motif 7: CO 5MT1 (2)
    • Motif 7: CO 5MT2378
    • Motif 7: CO 5MT2525
    • Motif 7: CO 5MT2858
    • Motif 7: CO 5MT3319
    • Motif 7: CO 5MT4545
    • Motif 7: CO 5MT4684
    • Motif 7: CO 5MT5018
    • Motif 7: CO 5MT7295
    • Motif 7: CO 5MT8511
    • Motif 7: CO 5MT8557
    • Motif 7: CO 5MT8565
    • Motif 7: CO 5MT8899
    • Motif 7: CO 5MT8937
    • Motif 7: CO 5MT9072
    • Motif 7: CO 5MT9168
    • Motif 7: CO 5MT9387
    • Motif 7: CO 5MT9540
    • Motif 7: CO 5MT10647
    • Motif 7: CO 5MT11861
    • Motif 7: CO 5MT12205
    • Motif 7: CO 5MV101
    • Motif 7: CO 5MV117
    • Motif 7: CO 5MV145
    • Motif 7: CO 5MV405
    • Motif 7: CO 5MV1060
    • Motif 7: NM 29SJ299
    • Motif 7: NM 29SJ423
    • Motif 7: NM 29SJ1659
    • Motif 7: NM LA2501
    • Motif 7: NM LA2506
    • Motif 7: NM LA2507
    • Motif 7: NM LA61956
    • Motif 7: NM LA80407
    • Motif 7: NM LA80422
    • Motif 7: NM LA80425
    • Motif 7: NM LA83507
    • Motif 7: UT 42SA13
    • Motif 7: UT 42SA3775
    • Motif 7: UT 42SA4989
    • Motif 7: UT 42SA6396
    • Motif 7: UT 42SA6757
    • Motif 7: UT 42SA8540
    • Motif 7: UT 42SA8543
    • Motif 7: UT 42SA8889
    • Motif 7: UT 42SA8895
    • Motif 7: UT 42SA20977
  • Motif 8
    • Motif 8: Forms and Variations
    • Motif 8 Caveats and Multi-Motifs
    • Motif 8: CO 5DL112 +
    • Motif 8: CO 5LP39
    • Motif 8: CO 5LP10201+
    • Motif 8: CO 5MT1 +
    • Motif 8: CO 5MT7295+
    • Motif 8: CO 5MT9072
    • Motif 8: CO 5MT9540+
    • Motif 8: CO 5MT11861+
    • Motif 8: NM 29SJ299+
    • Motif 8: NM LA2501
    • Motif 8: NM LA2506
    • Motif 8: NM LA2507+
    • Motif 8: NM LA80422+
    • Motif 8: UT 42SA2 +
    • Motif 8: UT 42SA3775+
  • Motif 9
    • Motif 9 Forms and Variations
    • Motif 9: AZ E81
    • Motif 9: AZ NA3570
    • Motif 9: CO 5DL112+
    • Motif 9: CO 5LP10201
    • Motif 9: CO 5MT1+
    • Motif 9: CO 5MT4684
    • Motif 9: CO 5MT5018+
    • Motif 9: CO 5MT9072+
    • Motif 9: CO 5MT9540+
    • Motif 9: CO 5MT10647+
    • Motif 9: CO 5MV117
    • Motif 9: CO 5MV118
    • Motif 9: NM 29SJ299+
    • Motif 9: NM LA2501
    • Motif 9: NM LA5631+
    • Motif 9: UT 42SA6396
    • Motif 9: UT 42SA13 +
  • BMII Textiles
    • BMII Textiles (pg. 2)
    • BMII & M1 (pg. 3)
    • BMII & M1 (pg. 4)
    • BMII & M1 (pg. 5)
    • BMII & M1 (pg. 6)
    • BMII & M2 (pg. 7)
    • BMII & M2 (pg. 8)
    • BMII & M7 (pg. 9)
    • BMII & M8 (pg. 10)
    • BMII & M9 (pg. 11)
    • BMII Summary (pg. 12)
  • SAA pg 1
Motif 1 in the Basketmaker III Period
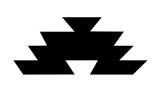
Motif 1 is a zoomorph or an anthropomorph, composed of a head, a body (usually) and one or two pairs of appendages.  A variety of head, body and appendage styles are found in Motif 1.   This motif occurs in three forms:  Reduced, Joined and Basic.
Picture
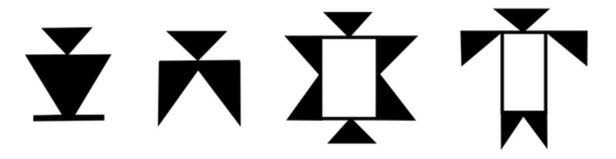
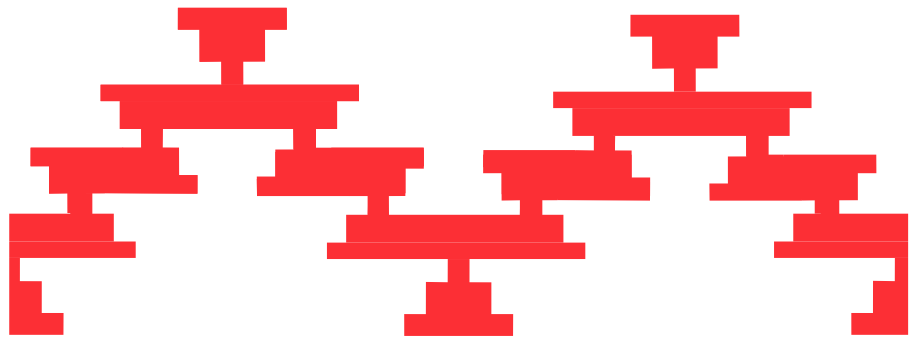
                                   Reduced  (Type 1)   Reduced (Type 2)                Joined                          Basic
Stylized drawings by author of Motif 1's three forms:  Reduced, Joined and Basic

Precursors of Motif 1 in the Basketmaker II Period
Nineteen textiles display designs that can reasonably be viewed as BMII precursors of Motif 1.  Of the 19 textiles, 14 resemble the Reduced Form, Type 1; one resembles the Reduced Form, Type 2; two resemble the Joined Form; and one resembles the Basic Form.  These are discussed in detail in the following pages, grouped by Form and Type.

Motif 1, Reduced Form, Type 1
Picture
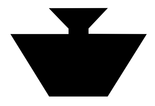
In its simplest form, it is easy to see the resemblance between the BMII figure (left) and the BMIII Motif 1 Reduced Type 1 (right).  They both display a head (triangular, often necked) and a body (triangular with flattened base).The major difference between the two is the relatively wider base of the BMII figure.  For the purposes of this report, this is termed a "two-tiered figure".
Picture

Picture
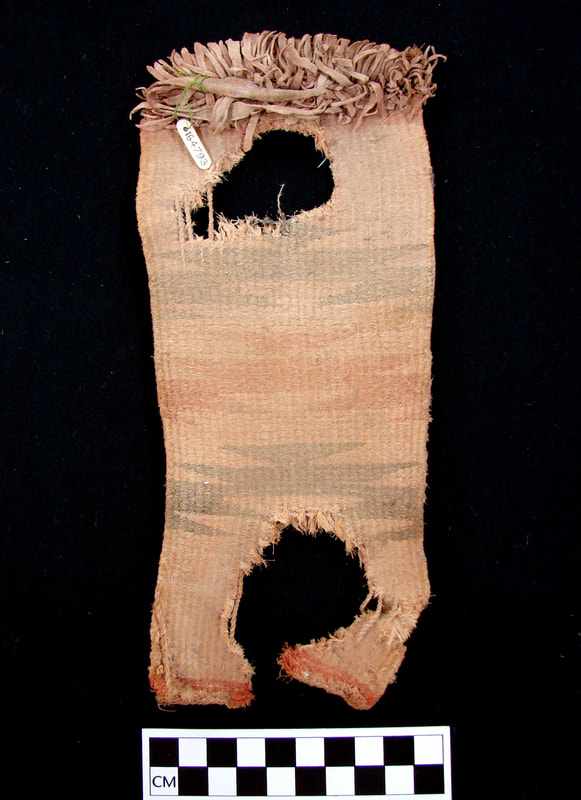
Cat. No. 164793   Courtesy of The Field Museum
Photograph by Laurie Webster
This sandal exhibits three upright two-tiered figures, aligned vertically.  Each figure displays a sharply pointed triangular head on a neck over a body with sharply pointed wings and a wide base on a thin baseline.
Picture
The color sequence, from fringed toe to heel, is white-black-white-red-white-black-white-red.  The intervening white spaces suggest three more two-tiered figures.

The lateral edges of BMII sandals sometimes depict inverted "half-figures" - figures that, given the scale of the design on the sandal, don't completely fit.

This sandal displays six half-figures.  A "fuller" version of two of these would probably have looked like this:
Picture

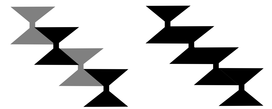
Increased design complexity was achieved through the combined use of figures and parallelograms.  ​Whether depicted on a basket, bag, band or sandal, the parallelograms served to connect alternating upright and inverted figures to each other.  ​​The overall pattern is that of a V, W or zig-zag line, with the figures placed at the apexes of the angles.The largest number of connecting parallelograms noted by the author so far is nine; the smallest number is one.  These parallelograms can be either plain (right top) or connected by lines, suggestive of interlocking necked heads (right bottom).
Picture
Picture

Picture
Picture
PM# 16-9-10/A3217.1  Peabody Museum Expedition, Samuel J. Guernsey, Director, 1916.  © President and Fellows of Harvard College, Peabody Museum of Archaeology and Ethnology
Digital tracing by author of select portion of Plate 24.h in
Guernsey and Kidder 1921
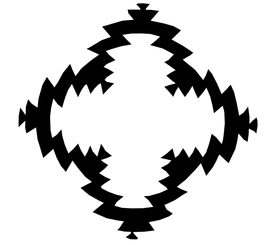
Based on the drawing (above right), this basket originally depicted eight figures connected by eight parallelograms.  The four exterior figures are upright, two-tiered and mounted on broad baselines (quadrilaterals).  The four interior figures are inverted and three-tiered.

Picture
Picture
Stylized drawing by author ​of three-tiered figure over two parallelograms, as shown on upper portion of basket (left). 
The fragmentary remains of this basket suggest four upright three-tiered figures connected by parallelograms.
PM# 16-9-10/A2881 (left)   Peabody Museum Expedition, Samuel J. Guernsey, Director, 1916. © President and Fellows of Harvard College,Peabody Museum of Archaeology and Ethnology

Picture
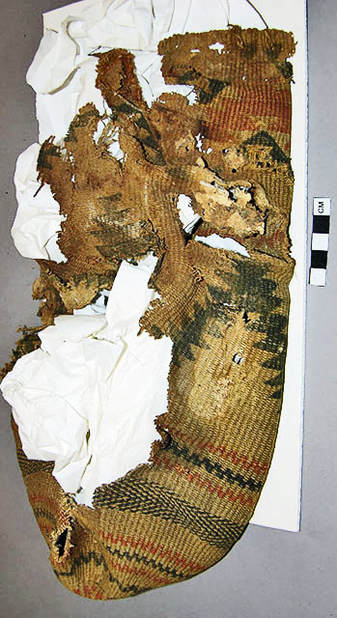
Upper Third:  Two red upright two-tiered figures are connected by parallelograms to one red inverted three-tiered figure.
Middle Third:  Two black upright three-tiered figures are connected by six parallelograms to one black inverted four-tiered figure.  Multi-tiered "white space" figures are suggested above and below these constructions.  
Picture
 ​PM# 16-9-10/A3903   Peabody Museum Expedition, Samuel J. Guernsey, Director, 1916.  © President and Fellows of Harvard College, Peabody Museum of Archaeology and Ethnology
                                     Plate 26.d in Guernsey and Kidder 1921

Picture
PM# 16-9-10/A2788   Peabody Museum Expedition, Samuel J. Guernsey, Director, 1916.  © President and Fellows of Harvard College, Peabody Museum of Archaeology and Ethnology
Date:  190 B.C. +/- 85 years (PMAE website)
Picture
Plate 26.d in Guernsey and Kidder 1921
stylized drawing by author of ​three-tiered figure on basket
Picture
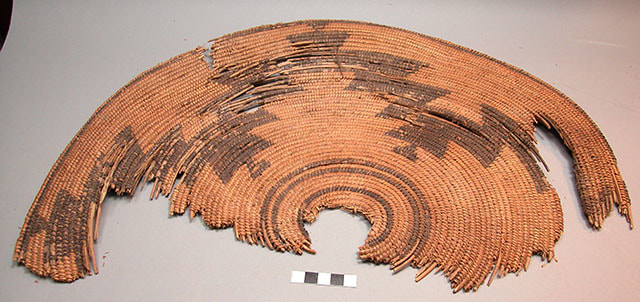
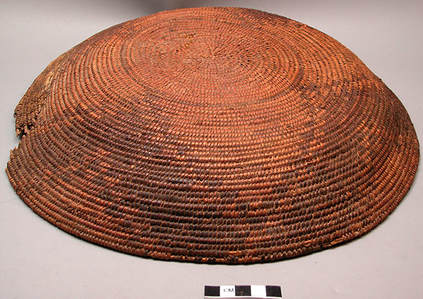
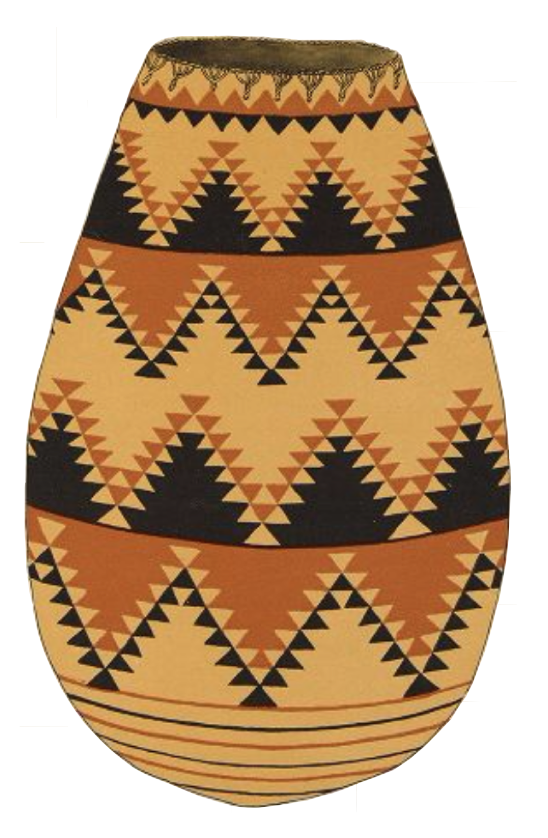
Based on Plate 26.d above, this basket appears to depict four squat, three-tiered figures indirectly connected by broad bands of up to nine parallelograms which merge along the rim.

Picture
A single three-tiered figure bordered on one side by two stepped triangles can be observed.  Also possibly present are a fourth tier (at top), two parallelograms (at bottom) and a third triangle (along left side).
​ PM# 16-9-10/A2884​   Peabody Museum Expedition, Samuel J. Guernsey, Director, 1916.  © President and Fellows of Harvard College, Peabody Museum of Archaeology and Ethnology

Picture
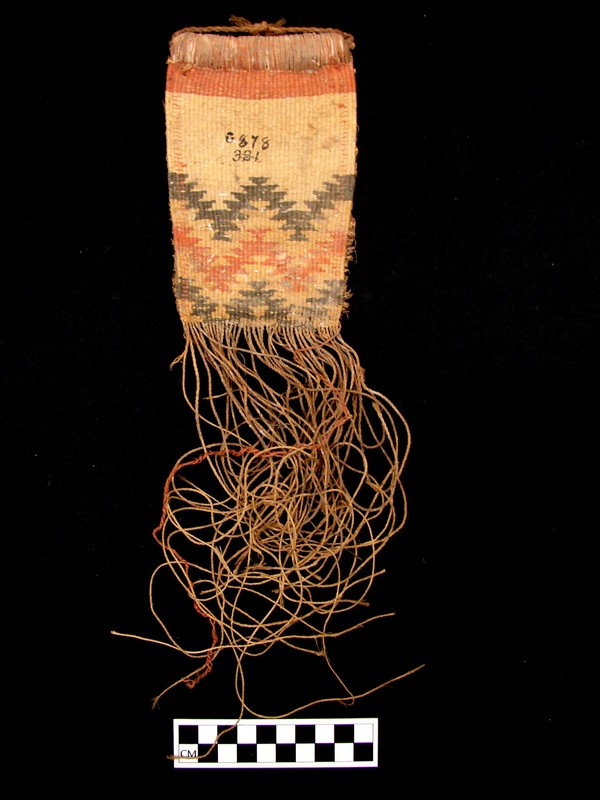
​MPC 1995.2.30.1 and 2
Courtesy of the Museum of Peoples and Cultures
Brigham Young University         Photograph by Laurie Webster
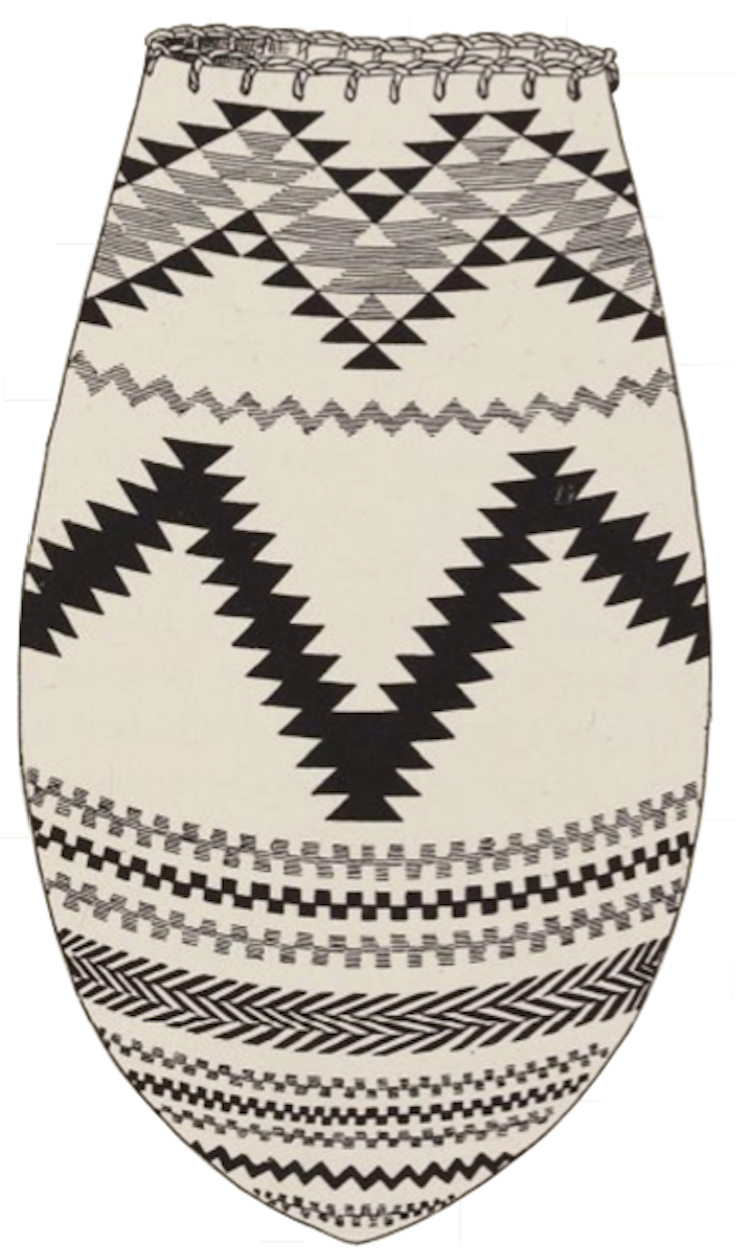
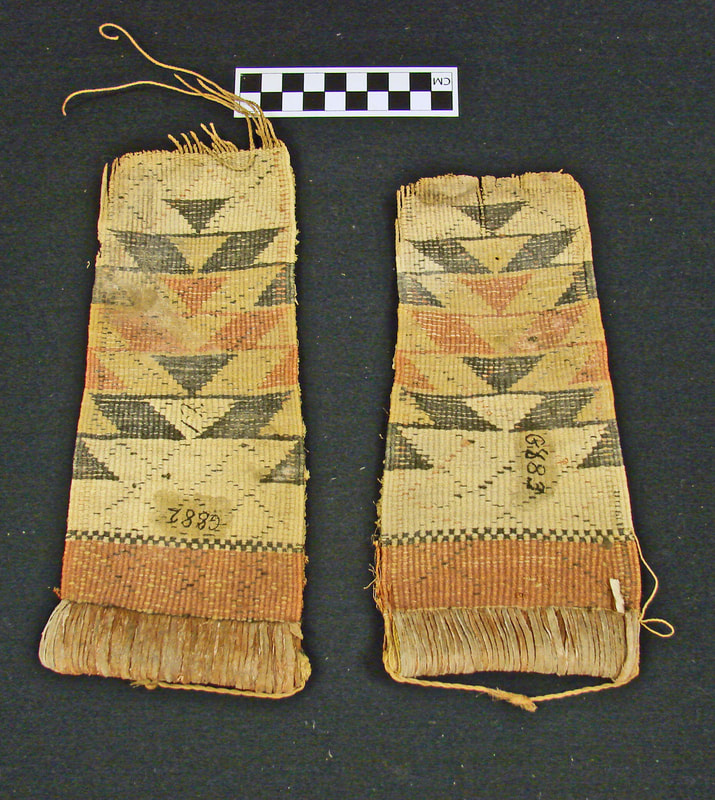
Each of these sandals depicts five three-tiered figures and one two-tiered figure, all of which lack baselines.    

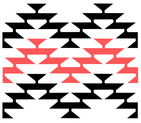
Each three-tiered figure is composed of
(Tier 1) a triangular head on a thin neck over
(Tier 2) a triangular body between left and right parallelograms over
(Tier 3) left and right half-parallelograms

For each three-tiered figure, Tier 2 and Tier 3 serve to enclose the head and body, respectively, of the figure below it, in the color sequence (from heel to toe) of black, tan, red, tan, black, white.  The two-tiered white figure terminates the sequence, as it does not enclose any figure.

Each lateral edge is lined with five quadrilaterals which experimentation shows only "work" as parallelograms and not as inverted heads.  This is due to the absence of necks.  The "full" version is thought to look like this:
Picture

Picture
This unfinished sandal shows five zig-zag rows of figures in color order black-tan-red-tan-black.
Picture
Stylized drawing by author of three-tiered figure over single left and right parallelograms.
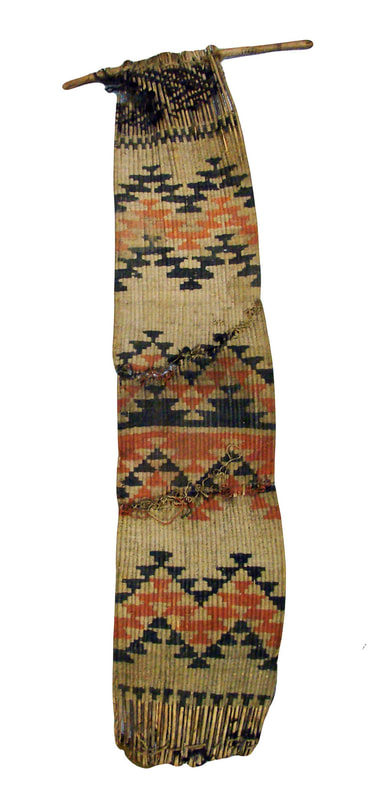
​MPC 1995.2.31.1
Courtesy of the Museum of Peoples and Cultures
Brigham Young University         Photograph by Laurie Webster

In addition to zig-zag lines, multi-tiered figures were also depicted on straight lines.  All figures of five or more tiers were apparently placed on straight lines.

Picture
H-13457 Courtesy of the Division of Anthropology,
American Museum of Natural History
​
Photograph by Laurie Webster
Upper third:  three zigzag rows ​
each row composed of
three complete two-tiered figures (two upright, one inverted), four parallelograms and
​two half-figures.
Picture

Middle third: two straight rows
black row composed of two complete upright three-tiered figures on baseline;
​red row composed of one complete and two half three-tiered figures on baseline, all inverted;
​red figures offset half-width from black figures
Picture

Lower third:  one zigzag row
three complete two-tiered figures (two upright, one inverted),
​four parallelograms and
two half-figures
​(same as upper third)
Picture

Picture
MPC 1995.2.149.1                                   ​                  
Courtesy of the Museum of Peoples and Cultures,
​Brigham Young University       Photograph by Laurie Webster
This unfinished sandal displays four half-figures bordered by V rows of figures and parallelograms.
V rows.  Most of the two V rows are obscured or missing.  The black portion of the upper V row contains a single inverted two-tiered figure connected by five necked polygons to a possible necked half-head.  The size of this head (?) is disproportionate to the rest of the row, but not to the red six-tiered half-figure just below it.  Its method of attachment is unique and somewhat awkward.  The lower V row has a red two-tiered figure and at least two necked polygons.
stylized drawing by author of complete six-tiered half-figures
Picture
Half-figures.  The two complete half-figures are both six-tiered.  The four half-figures are separated vertically by a checkerboard band of black and red squares between the upper (sandal heel) and lower (sandal toe) figures.  The half-figures are separated horizontally by narrow spaces between the right and left pairs.  This break is also clearly delineated in the checkerboard band as the point of color cross-over.  

Picture
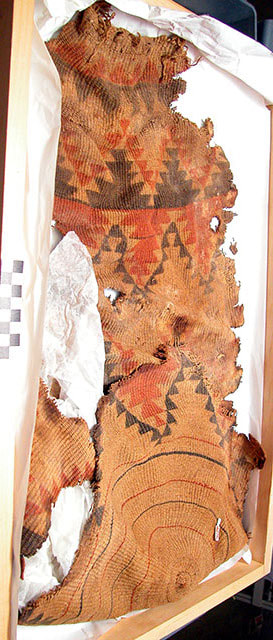
 Upper band, top half:  eight (estimated) figures, upright,  black, five-, six-, and seven-tiered, all on black baseline; upper
band, bottom half: eight (estimated) figures, inverted, red, six-tiered, all on red baseline
Lower band, top half:  eight (estimated) figures, upright,  black, six-tiered, all on black baseline; lower band, bottom half: eight (estimated) figures, inverted, red, six-tiered, all on red baseline
Picture
PM# 16-9-10/A2790  Peabody Museum Expedition, Samuel J. Guernsey, Director, 1916.  © President and Fellows of Harvard College, Peabody Museum of Archaeology and Ethnology.  Radiocarbon dated:  190 B.C. +/- 85 years (PMAE website)
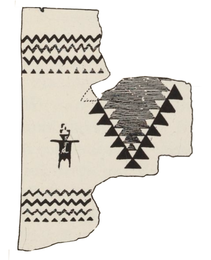
                     Plate 28 in Guernsey and Kidder 1921

Picture
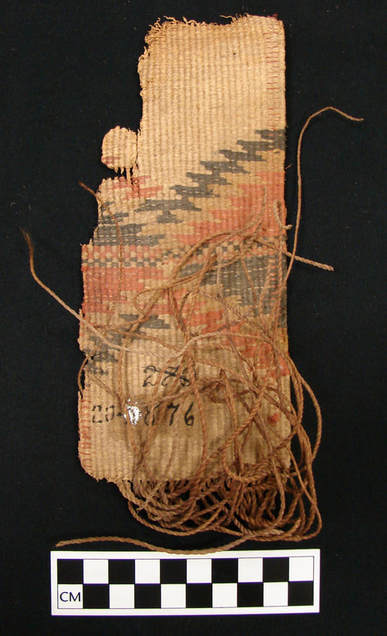
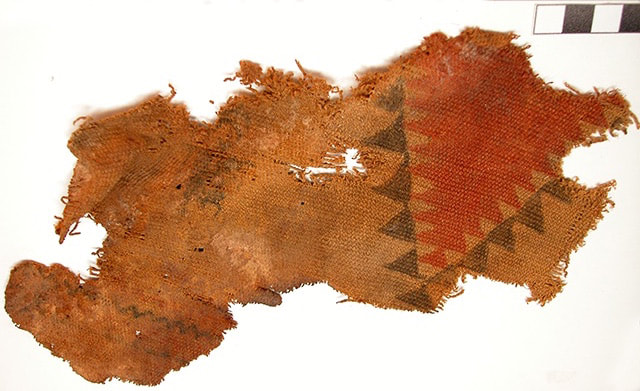
This textile depicts a ten- (or more) tiered red figure bordered by converging lines of black stepped triangles surmounted by a necked head.  The upright human figure suggests the "correct" orientation for the red figure is inverted.
Picture
PM# 17-34-10/A3576 (Cave 11)  Peabody Museum Expedition, Samuel J. Guernsey, Director, 1916.  © President and Fellows of Harvard College, Peabody Museum of Archaeology and Ethnology
Plate 26.d in Guernsey and Kidder 1921

Picture
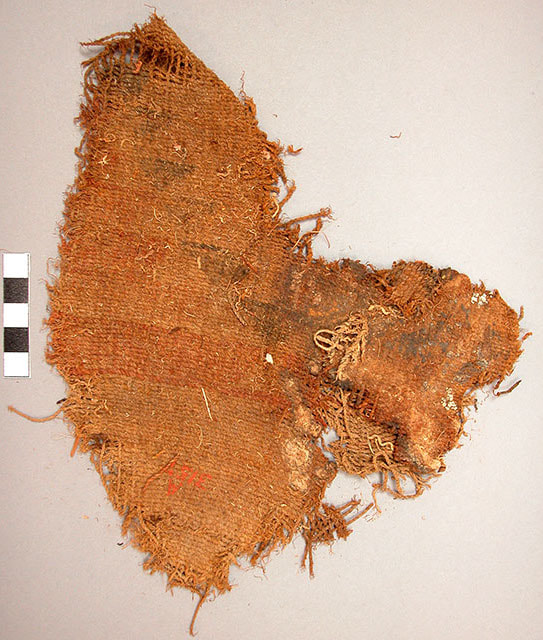
This fragment appears to depict portions of five red tiers mounted on a wide red baseline.  The tiers are bordered by five (or possibly six) stepped black triangles.
 # 16-9-10/A3157   Peabody Museum Expedition, Samuel J. Guernsey, Director, 1916.  © President and Fellows of Harvard College, Peabody Museum of Archaeology and Ethnology

Picture
Picture
stylized drawing by author of figure at upper basket edge
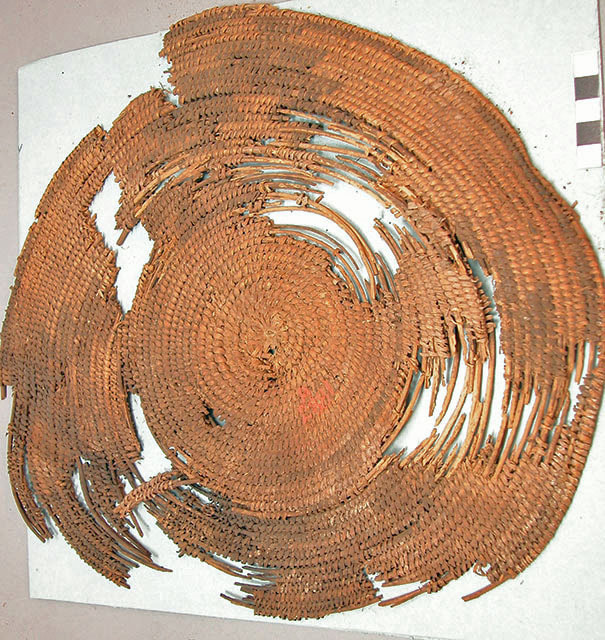
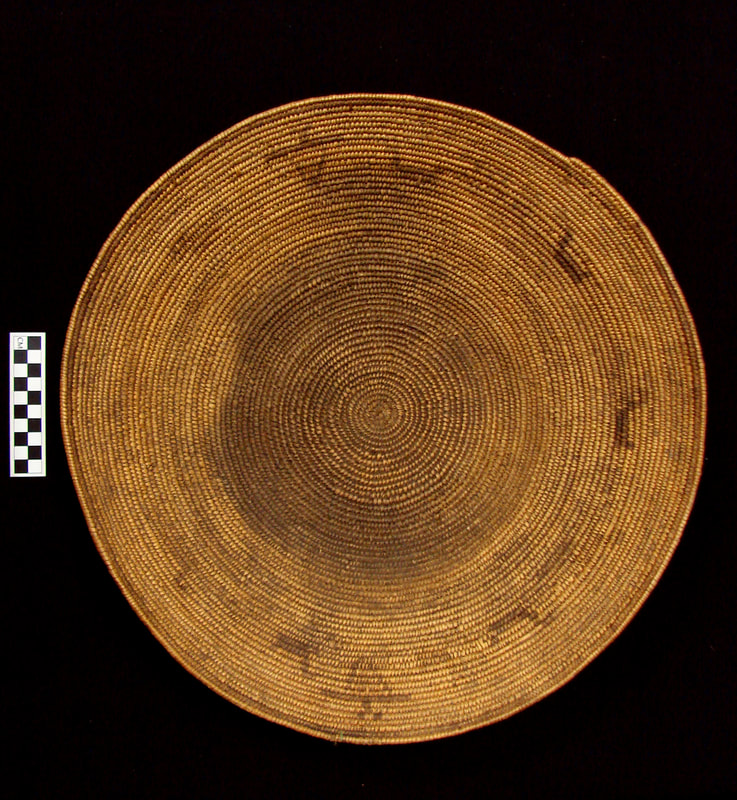
This basket displays two two-tiered figures along the rim, approximately 180 degree apart, and separated by two groups of four left-facing duck-like objects.  Unlike almost all the other textiles, this textile depicts all its design elements as unconnected to each other.

Each of the two figures has an open (unpainted) subtriangular body with a narrow base, and a pair of stick limbs at the shoulders.  On top of each neck is a non-triangular head - either a straight line (upper figure), or, apparently, two squares (lower figure).
H-13929     Courtesy of the Division of Anthropology, American Museum of Natural History     Photograph by Laurie Webster

Back
Basketmaker II Textiles, page 3
next
Powered by Create your own unique website with customizable templates.